Part of the Build it with DNotifier series: Part 1 · Part 2 · Part 3 · Part 4 · Part 5 · Part 6.
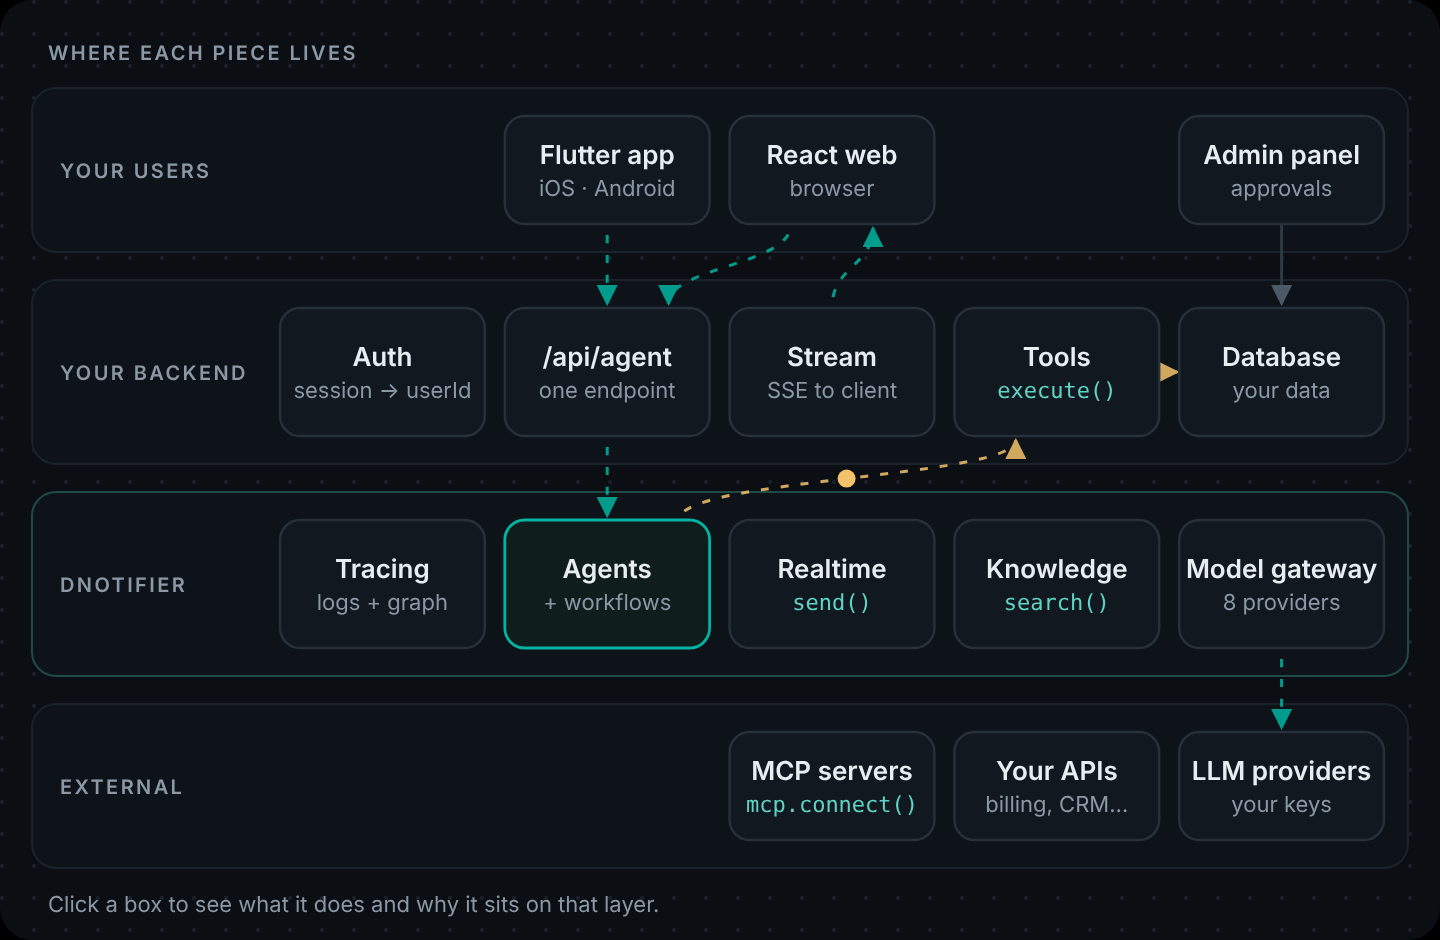
Short answer: put the agent behind your own backend. Clients (React, Flutter) call one endpoint on your server. Your server authenticates the user, holds the DNotifier secret and the tool code, and calls
runAgent. DNotifier runs the agent loop, calls the model, and hands tool calls back to your server, where your code reads your data. Progress streams back to the client. Anything irreversible goes through a person.
In part 1 we built an order-help agent and wired it to a React page and a Flutter screen. It worked. If you're figuring out how to add an AI agent to an app you already run, this article is about the decisions that make it hold up once real customers, real data and real money are involved. Most of them are about where things live, and most AI agent app integration bugs we see come from putting something in the wrong layer.
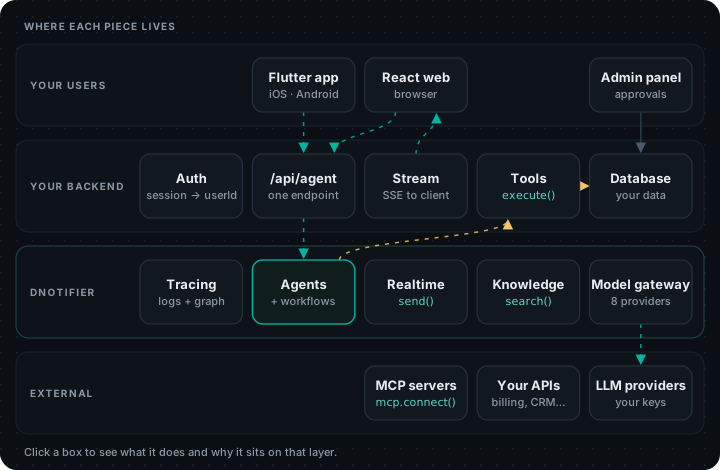
That agent architecture diagram is the whole AI agent system architecture we use in this series: four layers, and every piece has exactly one home. If you're unsure where something goes, ask: who must be able to see it, and who must never be able to change it?
Rule 1: The secret lives on your server, only
The DNotifier app secret can run agents, read your knowledge base and spend your model budget. Anything compiled into a web bundle or a mobile app can be extracted from it, so the secret can't be there.
That rules out the shortcut you'll see in some quickstarts (a VITE_ env var in React, or --dart-define in a release Flutter build). Those are fine for a demo on your own machine. For anything you ship, the pattern is:
React / Flutter ──HTTPS + your session──▶ your API ──secret──▶ DNotifierYour API is the only thing with credentials. It also becomes the natural place for rate limits, logging and abuse checks, which you'd want anyway.
Rule 2: Identity comes from your session, not from the model
An agent that reads user data needs to know which user. The tempting approach is to put it in the prompt: "The customer's ID is cus_ayesha." Now the model is the thing passing the ID to your tools, and models can be talked into things.
Instead, attach the user to the request in code and read it inside the tool. In Node, AsyncLocalStorage does this cleanly:
// notifier.js
import { AsyncLocalStorage } from "node:async_hooks";
export const requestContext = new AsyncLocalStorage();

// index.js: inside the route, after your auth middleware ran
const result = await requestContext.run({ userId: req.user.id }, () =>
  notifier.runAgent(orderAgent, { input, userId: req.user.id, maxToolRounds: 5 })
);

// tools.js: inside execute()
function currentUser() {
  const ctx = requestContext.getStore();
  if (!ctx?.userId) throw new Error("No signed-in user for this request");
  return ctx;
}
The tool fails closed: no user context, no data. In Dart, runZoned(..., zoneValues: {#userId: id}) and Zone.current[#userId] give you the same thing.
One caveat: this relies on your tool running inside the same async call chain as runAgent, which is how in-process tools normally run. Check it once with two test users when you wire it up. And because the check fails closed, if the context were ever missing you'd get an error, not someone else's data.
Rule 3: Tools are your permission boundary
The agent can only do what its tools do. So design tools the way you'd design an API for a junior developer you don't fully trust yet:
- Read tools (
orders.lookup,policy.search) are low risk if they're scoped by user. - Write tools should be narrow and reversible.
orders.updateShippingAddressbefore shipment, fine.orders.updatewith arbitrary fields, no. - Irreversible tools (refunds, payments, deletions, emails to third parties) shouldn't exist as agent tools at all. Give the agent a tool that requests the action instead.
Here's the refund tool from our example. It opens a ticket and tells the customer a person will review it:
export const requestRefund = notifier.tools.register({
  name: "refunds.request",
  description:
    "Open a refund request for review by the support team. " +
    "Use only after the customer clearly asks for a refund on a specific order.",
  inputSchema: {
    type: "object",
    properties: { orderId: { type: "string" }, reason: { type: "string" } },
    required: ["orderId", "reason"],
  },
  async execute({ orderId, reason }) {
    const { userId, progress } = currentUser();
    const order = ORDERS.find((o) => o.id === orderId && o.customerId === userId);
    if (!order) return { ok: false, note: "That order is not on this account." };
    const ticketId = `RF-${Date.now().toString(36).toUpperCase()}`;
    pendingRefunds.set(ticketId, { ticketId, orderId, userId, reason, amount: order.total, status: "pending_review" });
    progress?.(`Refund request ${ticketId} sent to the team`);
    return { ok: true, ticketId, status: "pending_review", reviewWithin: "1 business day" };
  },
});
Staff approve or reject from an admin screen, and your code calls the payment provider. The agent never touches money. That's human-in-the-loop with no framework magic: just a tool that writes to a queue.
On top of that, every agent declares which tools it may run:
permissions: {
  "orders.lookup": ["execute"],
  "policy.search": ["execute"],
  "refunds.request": ["execute"],
},
and in production the client is created with permissionEnforcement: "backend" so those permissions are checked server-side.
For approvals inside a longer process (pause a run, wait for a manager, continue), DNotifier workflows have ctx.waitForMessage(). We use it in How to Build an AI Workflow in Code.
Rule 4: Stream progress, not just the answer
An agent that calls two tools might take several seconds. A spinner for several seconds feels broken. "Looking up order A-1042…" followed by "Checking the help center…" feels like someone's working on it.
Here's the life of one request with streaming:
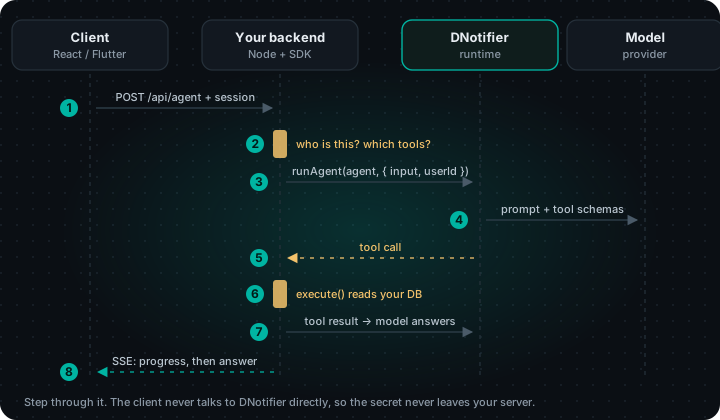
On the server, a second endpoint sends server-sent events. Tools report progress through the same request context, so each message reaches the right user:
server/index.js
// A second endpoint: progress events while tools run, then the answer.
app.post("/api/agent/stream", requireUser, async (req, res) => {
  const message = readMessage(req, res);
  if (!message) return;
  res.writeHead(200, {
    "Content-Type": "text/event-stream",
    "Cache-Control": "no-cache",
    Connection: "keep-alive",
  });
  const send = (event, data) =>
    res.write(`event: ${event}\ndata: ${JSON.stringify(data)}\n\n`);
  const ctx = {
    userId: req.user.id,
    progress: (label) => send("progress", { label }),
  };

  try {
    send("progress", { label: "Thinking" });
    const result = await requestContext.run(ctx, () =>
      notifier.runAgent(orderAgent, {
        input: buildInput(message, req.body.history),
        userId: req.user.id,
        maxToolRounds: 5,
      })
    );
    send("answer", { text: result.output, executionId: result.executionId });
  } catch (err) {
    console.error(err);
    send("error", { message: "The assistant could not answer right now." });
  } finally {
    res.end();
  }
});
On the client, EventSource only does GET requests, so we read the stream from fetch instead. The reader is about twenty lines; the rest is an ordinary chat component:
web/AgentChat.jsx
// AgentChat.jsx: a small chat box that talks to your backend, never to DNotifier directly.
import { useRef, useState } from "react";

// Reads "event: x\ndata: {...}\n\n" frames from a fetch() response body.
async function readEvents(response, onEvent) {
  const reader = response.body.getReader();
  const decoder = new TextDecoder();
  let buffer = "";
  for (;;) {
    const { value, done } = await reader.read();
    if (done) break;
    buffer += decoder.decode(value, { stream: true });
    let cut;
    while ((cut = buffer.indexOf("\n\n")) !== -1) {
      const frame = buffer.slice(0, cut);
      buffer = buffer.slice(cut + 2);
      const event = /^event: (.*)$/m.exec(frame)?.[1];
      const data = /^data: (.*)$/m.exec(frame)?.[1];
      if (event && data) onEvent(event, JSON.parse(data));
    }
  }
}

export default function AgentChat({ userId }) {
  const [messages, setMessages] = useState([]);
  const [status, setStatus] = useState("");
  const [busy, setBusy] = useState(false);
  const inputRef = useRef(null);

  async function send(e) {
    e.preventDefault();
    const text = inputRef.current.value.trim();
    if (!text || busy) return;
    inputRef.current.value = "";
    const history = messages.slice(-6);
    setMessages((m) => [...m, { role: "user", text }]);
    setBusy(true);

    try {
      const res = await fetch("/api/agent/stream", {
        method: "POST",
        headers: { "Content-Type": "application/json", "x-demo-user": userId },
        body: JSON.stringify({ message: text, history }),
      });
      if (!res.ok) throw new Error(`HTTP ${res.status}`);
      await readEvents(res, (event, data) => {
        if (event === "progress") setStatus(data.label + "…");
        if (event === "answer") setMessages((m) => [...m, { role: "assistant", text: data.text }]);
        if (event === "error") setMessages((m) => [...m, { role: "assistant", text: data.message }]);
      });
    } catch {
      setMessages((m) => [...m, { role: "assistant", text: "Something went wrong. Try again in a moment." }]);
    } finally {
      setStatus("");
      setBusy(false);
    }
  }

  return (
    <div className="agent-chat">
      <ul aria-live="polite">
        {messages.map((m, i) => (
          <li key={i} className={m.role}>{m.text}</li>
        ))}
        {status && <li className="status">{status}</li>}
      </ul>
      <form onSubmit={send}>
        <input ref={inputRef} placeholder="Ask about an order, e.g. Where is A-1042?" disabled={busy} />
        <button disabled={busy}>Send</button>
      </form>
    </div>
  );
}
For Flutter, the simplest approach is the plain JSON endpoint from part 1 with a "Checking…" row while the request runs. If you want the progress lines on mobile too, package:http can read the same event stream with client.send() and response.stream.
Rule 5: Put hard limits everywhere
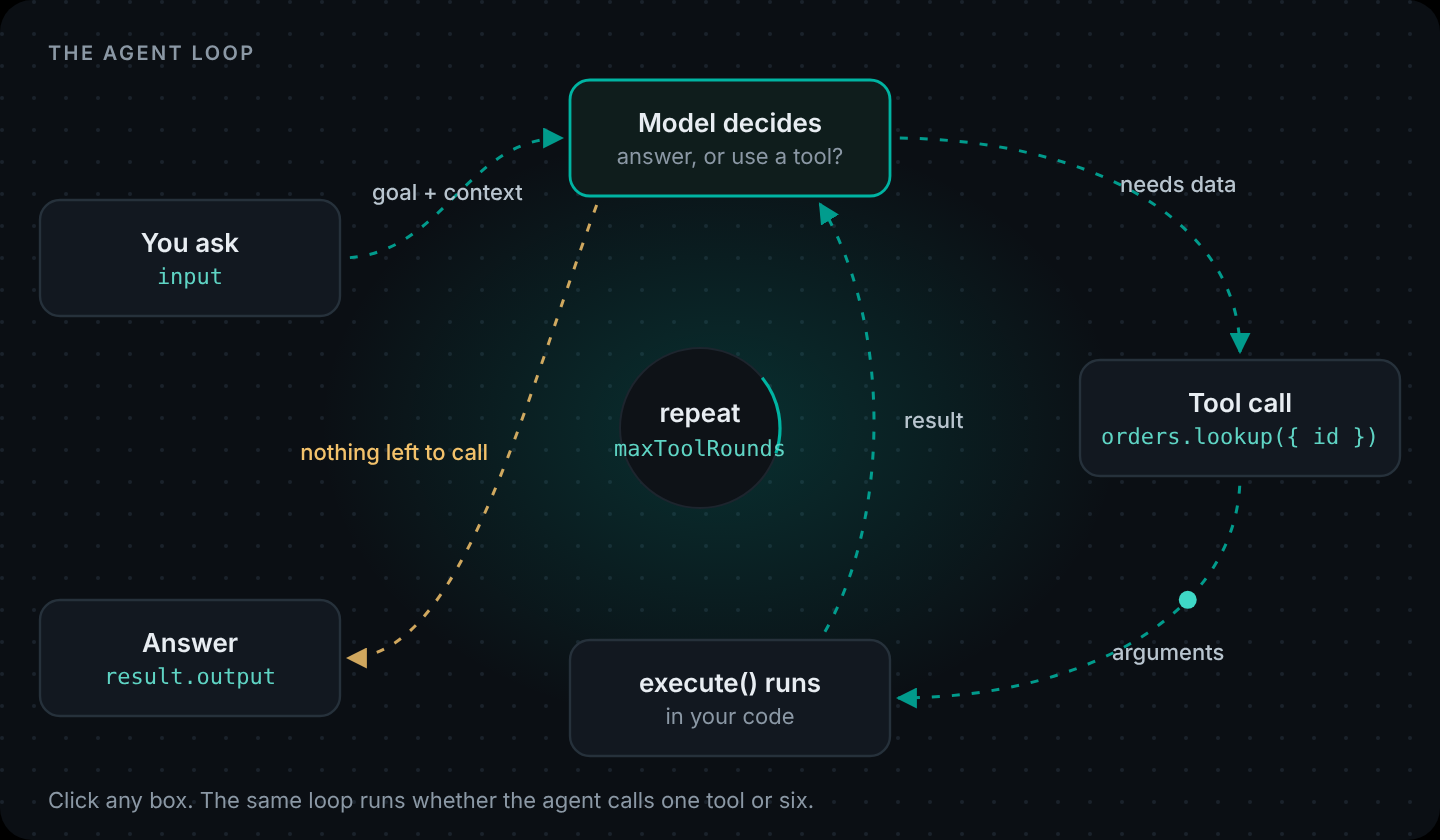
Agents are loops, and loops need ceilings. The loop itself is the ReAct pattern. A task that outgrows one conversation is a deep agent, and it should not sit on an open HTTP request.
| Limit | Where | Why |
|---|---|---|
maxToolRounds (we use 5) | runAgent options | Stops a confused agent repeating tool calls |
| Message length (2,000 chars) | your route | Keeps prompts and costs predictable |
| History (last 6 turns, 500 chars each) | your route | Memory without an ever-growing prompt |
| Body size (32 KB) | express.json({ limit }) | Basic abuse protection |
| Request timeout (60 s) | client | Users get an error instead of an endless spinner |
| Per-user rate limit | your API gateway or middleware | One user can't spend your monthly budget |
Rule 6: Make every run traceable
Set observability: true on agents and workflows. Each run gets an execution ID; return it to the client (we include it in the response) and log it next to the user's message. When someone reports a wrong answer, you open that run in the dashboard and see exactly which tools ran, with what input and output.
Keep secrets, tokens and raw personal data out of tool inputs and outputs, since traces are visible to anyone with dashboard access. Use separate DNotifier apps (and secrets) for development and production.
Where realtime fits
DNotifier also does realtime messaging: send() to one or many user IDs, chat history, binary payloads. In an agent app, that's how backend services and remote agents talk to each other, and how a waiting workflow receives an approval. For pushing agent progress to browsers and phones, stream from your own backend as shown above, so clients never hold DNotifier credentials.
The same architecture on AWS, Azure and Google Cloud
The four layers above map one-to-one onto managed services. Your users' devices stay where they are. "Your backend" becomes one container, a secret store and a database. DNotifier stays hosted. And if you want inference on your own cloud bill, the model provider can be that cloud's own: Bedrock, Azure OpenAI or Gemini.
Deploy to AWS
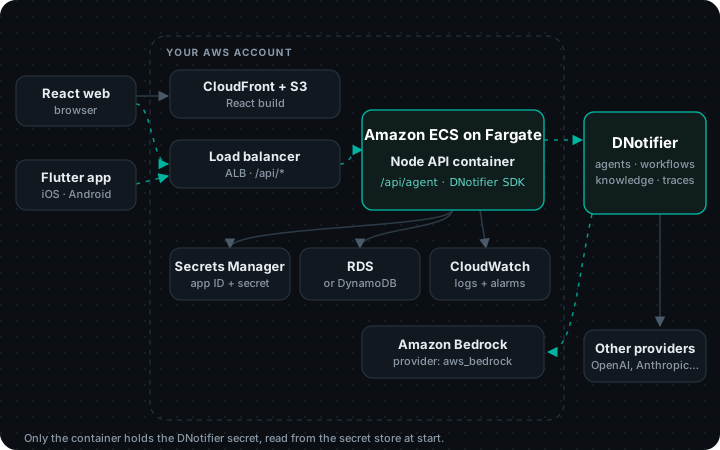
| Piece | AWS service | Why |
|---|---|---|
| React build | S3 bucket behind CloudFront | Static files on a CDN. Add a second CloudFront behavior for /api/* pointing at the load balancer, so the browser calls the same domain. |
| Node container | Amazon ECS on Fargate, behind an Application Load Balancer | Long-lived containers handle server-sent events and WebSockets without timeouts. (App Runner moved to maintenance mode in 2026; AWS points new apps to ECS Express Mode.) |
| App ID + secret | AWS Secrets Manager | Injected into the task as environment variables through the task definition's secrets block. Never baked into the image. |
| Your data | Amazon RDS or DynamoDB | Only your tool code talks to it, from inside the VPC. |
| Logs | CloudWatch Logs | Log the DNotifier executionId next to each request, so you can jump from a CloudWatch line to the run trace. |
| Models (optional) | Amazon Bedrock via the aws_bedrock provider | Add Bedrock in AI Studio → Providers if you want inference billed to your AWS account. Any other provider works too. |
# 1. Store the credentials (once)
aws secretsmanager create-secret --name dnotifier/prod \
  --secret-string '{"DNOTIFIER_APP_ID":"<app-id>","DNOTIFIER_SECRET":"<secret>"}'

# 2. Build and push the image
aws ecr create-repository --repository-name order-help-api
aws ecr get-login-password | docker login --username AWS --password-stdin <account>.dkr.ecr.<region>.amazonaws.com
docker build -t <account>.dkr.ecr.<region>.amazonaws.com/order-help-api:1 .
docker push <account>.dkr.ecr.<region>.amazonaws.com/order-help-api:1

# 3. In the ECS task definition, pull the values from Secrets Manager:
#   "secrets": [
#     { "name": "DNOTIFIER_APP_ID", "valueFrom": "<secret-arn>:DNOTIFIER_APP_ID::" },
#     { "name": "DNOTIFIER_SECRET", "valueFrom": "<secret-arn>:DNOTIFIER_SECRET::" }
#   ],
#   "portMappings": [{ "containerPort": 3001 }]
Watch out: Set the load balancer's idle timeout above your longest agent run if you use the streaming endpoint.
Deploy to Azure
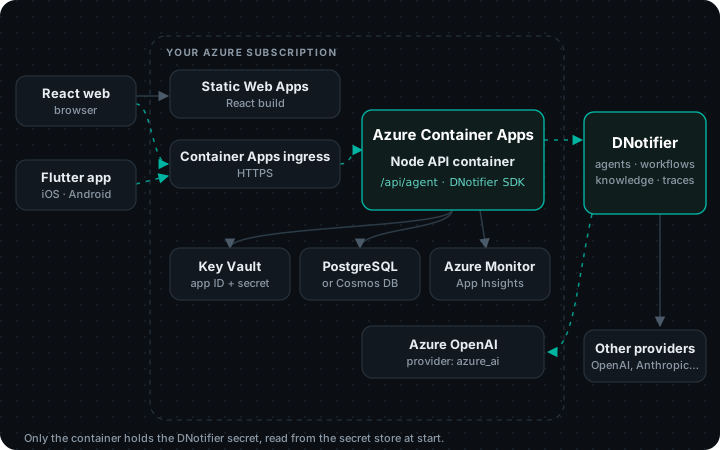
| Piece | Azure service | Why |
|---|---|---|
| React build | Azure Static Web Apps | Link the Container App as the site's backend (Standard plan) so /api calls stay on the same domain, or call the API's own URL with CORS. |
| Node container | Azure Container Apps | Managed containers with HTTPS ingress, scale rules and long-lived connections. |
| App ID + secret | Container Apps secrets, backed by Key Vault | Store the secret in Key Vault and reference it from the app with a managed identity; expose it as an env var with secretref:. |
| Your data | Azure Database for PostgreSQL or Cosmos DB | Reachable only from your app's environment. |
| Logs | Azure Monitor / Application Insights | Log the DNotifier executionId with each request. |
| Models (optional) | Azure OpenAI via the azure_ai provider | Keeps model usage on your Azure bill and in your chosen region. Any other provider works too. |
# 1. Build from source and deploy (creates the environment if needed)
az containerapp up --name order-help-api --resource-group dnotifier-rg \
  --location westeurope --source . --ingress external --target-port 3001

# 2. Add the secret and point env vars at it
az containerapp secret set -n order-help-api -g dnotifier-rg \
  --secrets dnotifier-secret=<secret>
az containerapp update -n order-help-api -g dnotifier-rg \
  --set-env-vars DNOTIFIER_APP_ID=<app-id> DNOTIFIER_SECRET=secretref:dnotifier-secret NODE_ENV=production
Watch out: If you use Static Web Apps linked backends, the API is only reachable through the site; that's usually what you want.
Deploy to Google Cloud
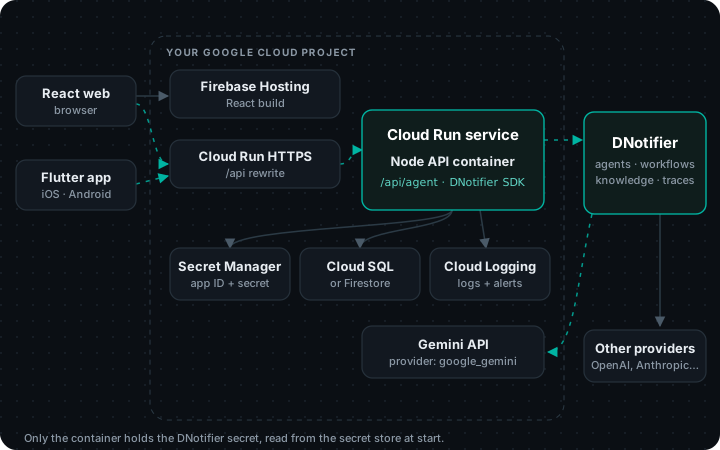
| Piece | Google Cloud service | Why |
|---|---|---|
| React build | Firebase Hosting | Rewrite /api/** to the Cloud Run service so the browser calls the same domain. Hosting-to-Cloud Run requests time out after 60 seconds, so keep agent runs short or call Cloud Run's URL directly for long streams. |
| Node container | Cloud Run | Deploy straight from source. Cloud Run sets PORT, which the example server already reads. |
| App ID + secret | Secret Manager | Mounted as env vars with --set-secrets. Never in the image or in the repo. |
| Your data | Cloud SQL or Firestore | Only your tool code reads it. |
| Logs | Cloud Logging | Log the DNotifier executionId with each request. |
| Models (optional) | Gemini via the google_gemini provider | Add your Gemini key in AI Studio → Providers. Any other provider works too. |
# 1. Store the secret (once)
printf '%s' '<secret>' | gcloud secrets create dnotifier-secret --data-file=-

# 2. Build from source and deploy
gcloud run deploy order-help-api --source . --region europe-west1 \
  --set-env-vars DNOTIFIER_APP_ID=<app-id>,NODE_ENV=production \
  --set-secrets DNOTIFIER_SECRET=dnotifier-secret:latest \
  --allow-unauthenticated   # your own auth still runs inside the app
Watch out: Cloud Run scales to zero by default. The first request after a quiet period pays a cold start; set --min-instances 1 if that matters.
# Dockerfile (same on every cloud)
FROM node:22-slim
WORKDIR /app
COPY package*.json ./
RUN npm install --omit=dev
COPY . .
ENV NODE_ENV=production
EXPOSE 3001
CMD ["node", "index.js"]
If you're on AWS and using Bedrock, our DNotifier on AWS series goes deeper: VPC options, guardrails, event-driven agents and AgentCore tools.
A production checklist
- Secret in a secret manager; separate apps for dev and prod
- Clients call your API only; no DNotifier credentials in web or mobile builds
- User identity from your auth, carried in request context, checked inside every tool
- Each tool scoped to the signed-in user; internal fields stripped from results
- Irreversible actions behind human approval
permissionsdeclared per agent;permissionEnforcement: "backend"in productionmaxToolRounds, input caps, history caps, timeouts and rate limits in placeobservability: true; execution IDs logged; no PII in step data- Tested with off-topic, hostile and cross-account questions
The runtime, tools, knowledge base and tracing are built in. You bring the app and the rules. Create your app · Security best practices
Next in the series: Part 4: How to Build an AI Workflow in 5 Minutes
Get the code. Every example in this series, as runnable projects: dnotifier-agent-workflow-examples.zip. Run each one with your own app ID, secret and model key.
FAQ
Should the AI agent run in the browser or on the server?
On the server. The agent needs credentials and access to your data, and both belong on your backend. The browser calls your API.
How do I add an AI agent to an existing React app?
Add one backend endpoint that authenticates the user and calls runAgent, then a chat component that posts to it. The React code doesn't need an AI SDK at all. See the component in this article and the plain version in part 1.
How do I add an AI agent to a Flutter app?
The same way: a backend endpoint plus an HTTP call from Flutter. Don't put the DNotifier secret in the app. The Dart SDK is great on a Dart backend, or for prototypes on your own device.
What does a good AI agent backend architecture look like?
One endpoint per agent or workflow, a single SDK client per server, the user attached to each request in code, tools that filter by that user, hard limits on input size and tool rounds, and tracing on. That small set is the AI agent backend infrastructure most apps need; you don't need a separate agent server to start.
How do I stop an AI agent from leaking another user's data?
Never let the model choose whose data to read. Attach the signed-in user in code (AsyncLocalStorage in Node, zones in Dart) and filter every query by that user inside the tool.
What is human-in-the-loop for AI agents?
A person approves certain actions before they happen. The simplest version is a tool that creates a pending request instead of acting. For multi-step processes, a workflow can pause with ctx.waitForMessage() until someone decides.