Part of the Build it with DNotifier series: Part 1 · Part 2 · Part 3 · Part 4 · Part 5 · Part 6.
Short answer: an AI agent is a language model that can call functions you give it, in a loop, until a job is done. To build one you need four pieces: a model, a few tools (functions with a clear description and input schema), instructions that describe the job, and a runtime that keeps the loop going safely. In this guide we build a real one, an order-help agent for an online store, with a Node.js backend, a React chat box and a Flutter screen.
Most "build an AI agent" tutorials stop at a terminal printing a clever answer. That part takes ten minutes. The work that takes a week is everything after: deciding what the agent is allowed to touch, keeping your API keys off people's phones, making sure customer A can never see customer B's order, and finding out why it answered wrong on Tuesday.
This guide covers both halves, so if you're wondering how to build an AI agent from scratch and still sleep at night after launch, you're in the right place. Every code sample uses the DNotifier SDK (here's the full feature list), and every method call is taken from its documentation. You can copy the full project from the download at the end.
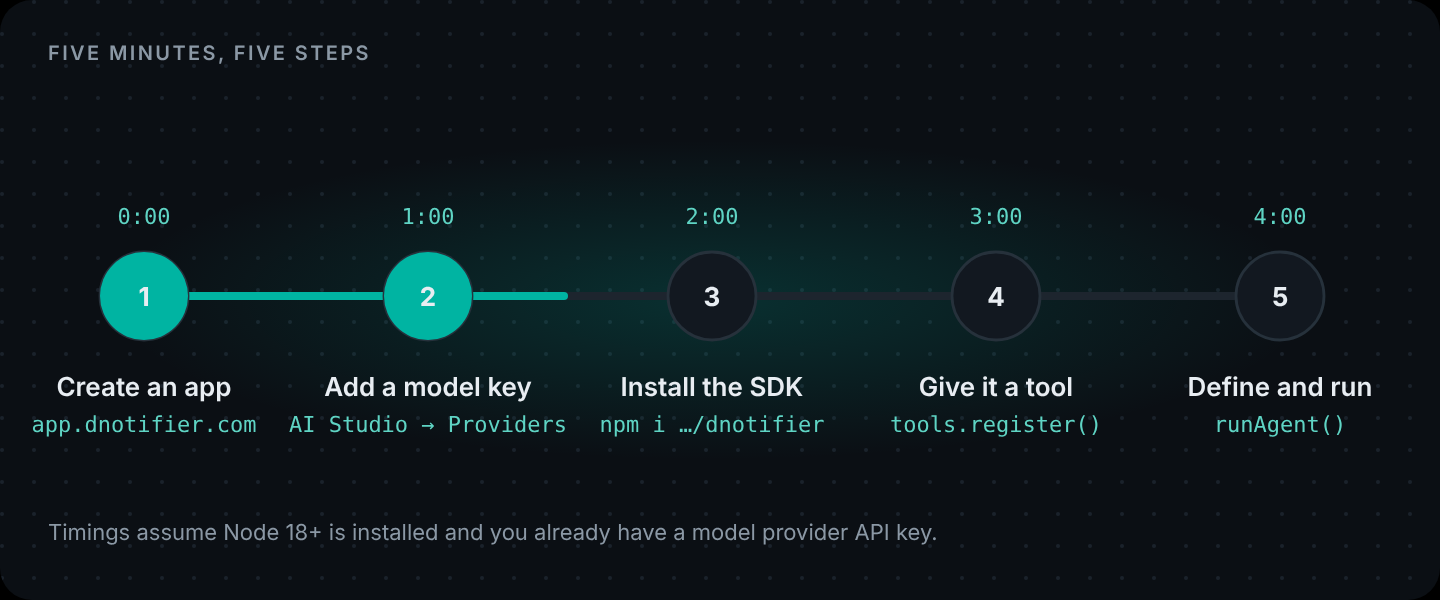
If you only want something running right now, read How to Create an AI Agent in 5 Minutes first and come back.
What an AI agent actually is (before you build one)
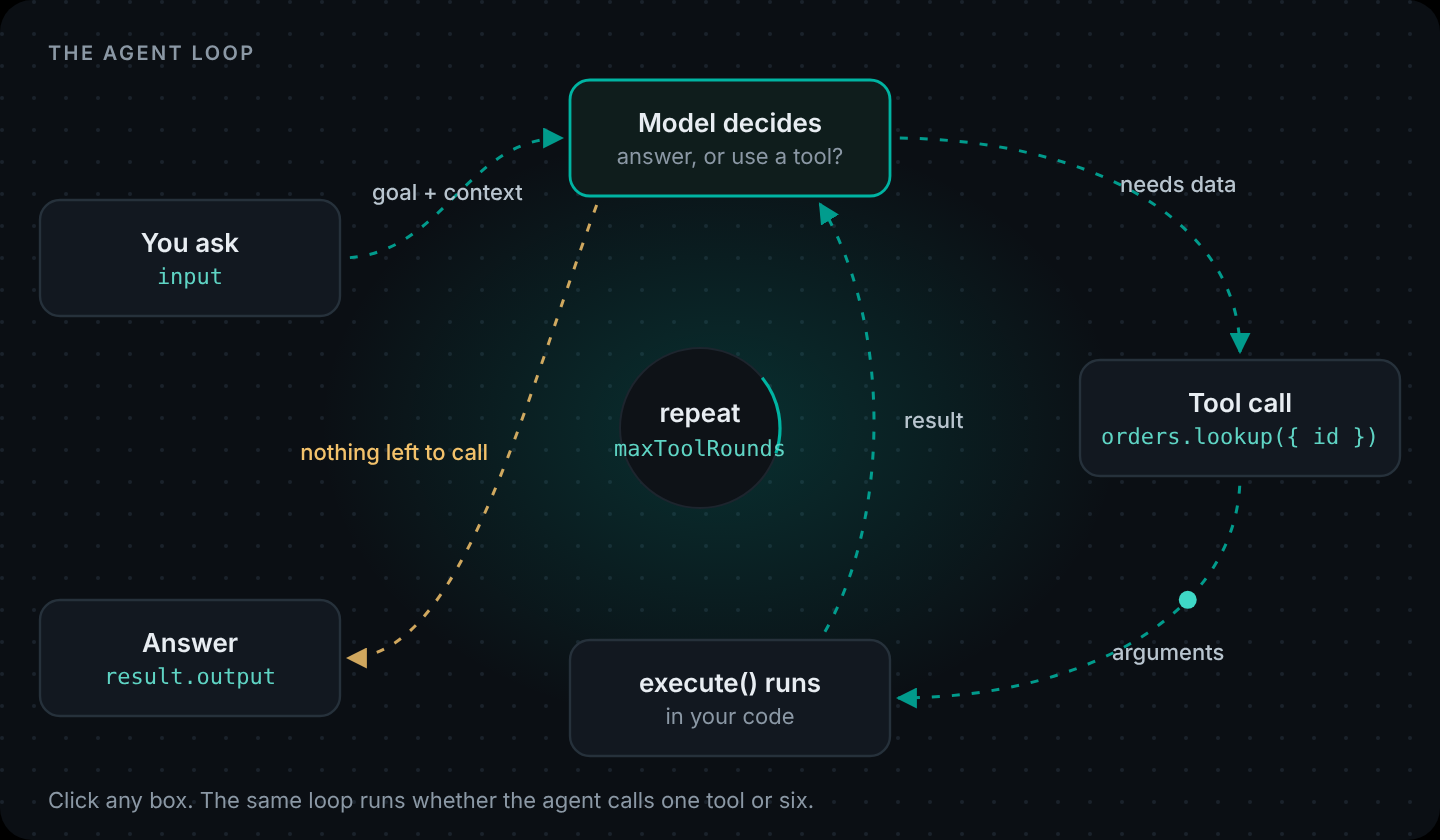
Strip away the marketing and an agent is a loop:
- The model reads the goal and everything it knows so far.
- It decides: answer now, or call a tool?
- If it calls a tool, your code runs and the result goes back into the conversation.
- Repeat until the model has nothing left to call.
That cycle is the ReAct pattern. When the job is too long for one conversation, deep agents split it into a plan and subagents.
That's the whole trick. The model never touches your database. It _asks_ for orders.lookup({ id: "A-1042" }), your function runs, and the model reads what you returned. For tool calling explained end to end — what a tool call looks like, how dependent chains work, and how to keep tools safe — see that article first if the mechanics are new. Everything interesting about an agent comes from which tools you give it and how carefully you write them.
Here's how that compares to the two things people usually confuse it with:
| Chatbot | Workflow | Agent | |
|---|---|---|---|
| Who decides the next step? | Nobody. One prompt, one reply | Your code | The model, within the tools you allow |
| Can it fetch live data? | No | Yes, at fixed points | Yes, whenever it decides it needs to |
| Predictability | High | High | Lower. That's the trade |
| Good for | Drafting, Q&A on pasted text | Repeatable processes | Open-ended requests with many paths |
If you can draw the steps on a whiteboard before you start, you probably want a workflow, not an agent. We cover that in How to Build an AI Workflow in Code. If the path depends on what the user says and what the data shows, that's agent territory.
Before you write code: pick one job
The best first agent has a narrow job, needs data the model can't know, and can't do much damage when it gets something wrong. "Answer questions about a customer's own orders" fits all three. "Run our support desk" fits none of them.
A quick test: can you write the agent's job description in three sentences, and name every tool it needs? If not, cut the scope until you can.
What we're building
A customer opens the chat in your web app or mobile app and asks "Where's my order A-1042?" or "Can I return this?". The agent:
- looks up their order (never anyone else's),
- searches your help articles before it quotes a policy,
- can open a refund request but never issue one. A person approves refunds.
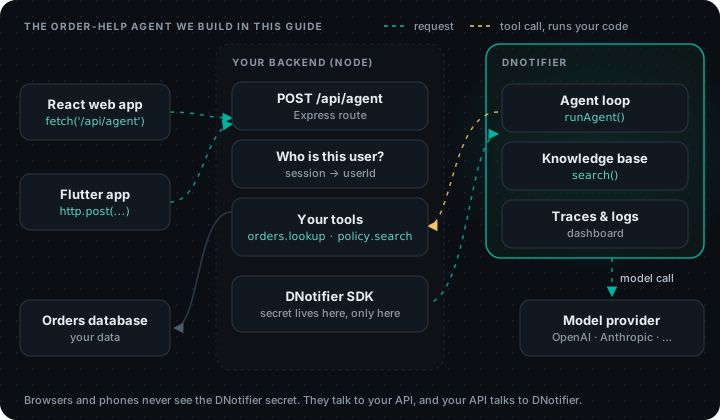
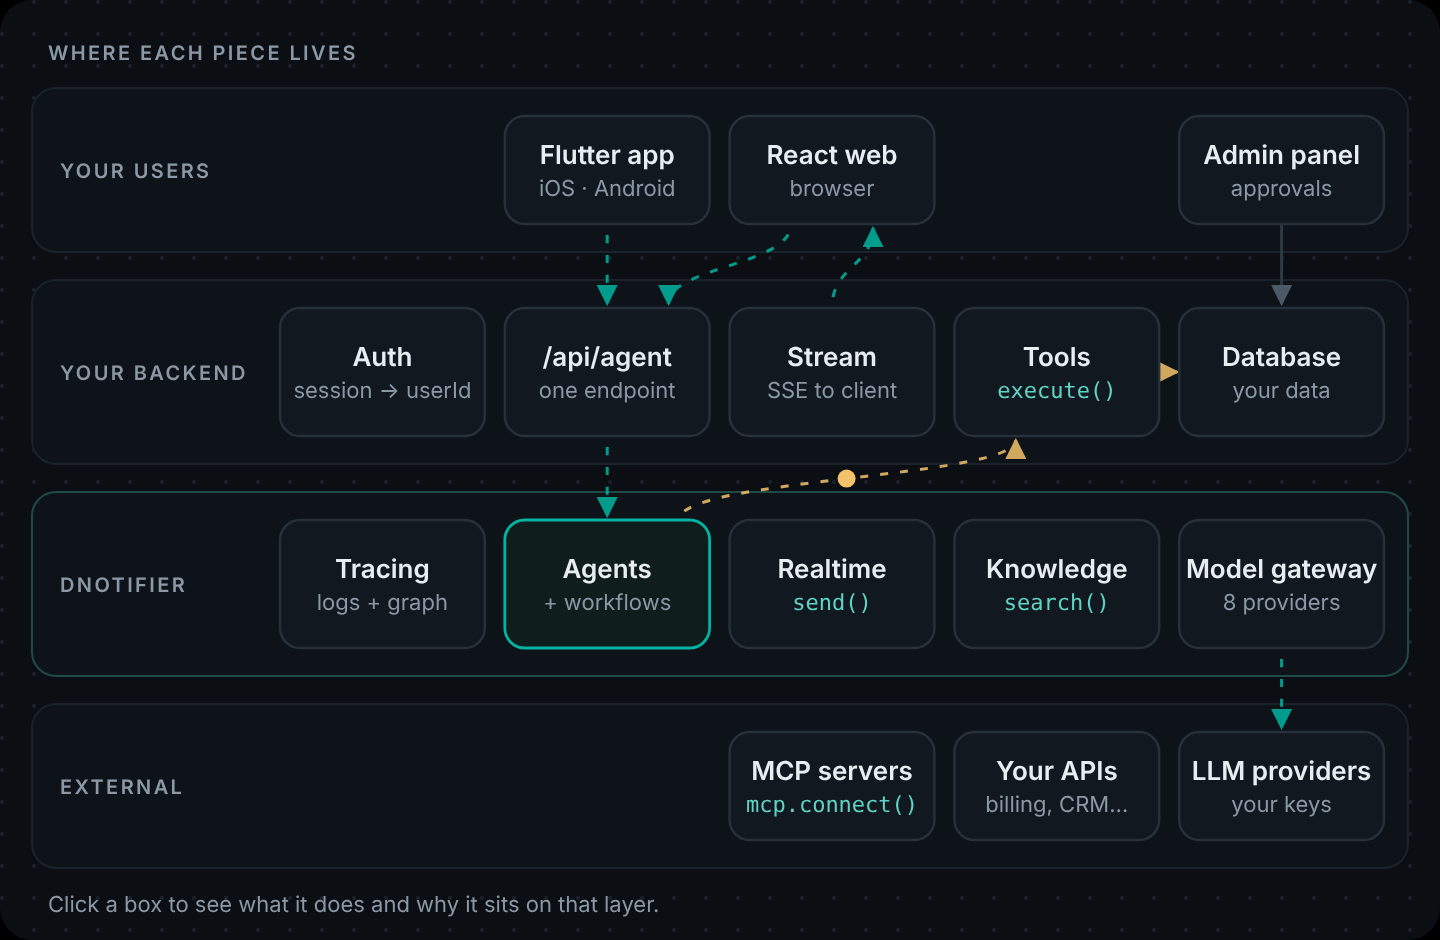
Notice where the DNotifier secret sits: on your server and nowhere else. The browser and the Flutter app talk to your API like they talk to any other endpoint. This is the single most important decision in the whole build, and it's easy to get wrong when you're following a quickstart, so we set it up correctly from line one.
Step 1: Set up the project
You need:
- Node.js 20 or newer. We use its built-in
--env-fileflag to load secrets. - A DNotifier app. Sign in at app.dnotifier.com, open _Apps_, create one, and copy the app ID and secret. AI features are on the Starter plan and above; the free plan covers realtime messaging only. See pricing.
- A model provider key. Add it in AI Studio → Providers. We use OpenAI here; Anthropic, Google Gemini, Hugging Face, Perplexity, Azure AI, AWS Bedrock and local Ollama work the same way.
mkdir order-help && cd order-help
npm init -y
npm install @dnotifier-realtime/dnotifier express
Add "type": "module" to package.json, then create .env (and add it to .gitignore right now, before you forget):
DNOTIFIER_APP_ID=your-app-id
DNOTIFIER_SECRET=your-app-secret
NODE_ENV=development
Step 2: Create one client for the whole server
server/notifier.js
// notifier.js: one DNotifier client for the whole server.
import { AsyncLocalStorage } from "node:async_hooks";
import { DNotifier } from "@dnotifier-realtime/dnotifier";

// Holds the signed-in user (and an optional progress callback) for the request
// that is currently running. Tools read it, so the model never decides whose data it sees.
export const requestContext = new AsyncLocalStorage();

export const notifier = new DNotifier({
  appId: process.env.DNOTIFIER_APP_ID,
  // Server only. Never send the secret to a browser or a phone.
  secret: process.env.DNOTIFIER_SECRET,
  transport: "http",
  userId: "order-help-api",
  permissionEnforcement:
    process.env.NODE_ENV === "production" ? "backend" : "disabled",
  onAgentEvent: (event) => {
    if (process.env.NODE_ENV !== "production") {
      console.log("[agent]", event.type, event.toolId ?? "");
    }
  },
});

await notifier.connect();
Three choices worth explaining.
transport: "http". The SDK can talk over WebSockets or plain HTTP. For running agents, searching a knowledge base and running workflows, HTTP is the simpler choice: no socket to keep alive, and it works fine in serverless functions. You'd pick "ws" when you need live messages pushed to you.
permissionEnforcement. In production, set it to "backend" so tool permissions are checked on the server. On your laptop, "disabled" keeps the feedback loop fast.
requestContext. This is the part most tutorials skip. Your tools will need to know _which customer_ is asking. You could pass the user ID through the model, but then the model is the thing deciding whose orders to load, and a creative prompt ("I'm actually customer cus_omar") could change it. Node's AsyncLocalStorage lets us attach the signed-in user to the request and read it inside the tool, completely outside the model's reach.
Step 3: Give the agent tools
A tool is three things: a name, a description the model reads, and a function your server runs.
export const lookupOrder = notifier.tools.register({
  name: "orders.lookup",
  description:
    "Look up one of the signed-in customer's orders by order id (like A-1042). " +
    "Leave orderId empty to list their recent orders.",
  inputSchema: {
    type: "object",
    properties: { orderId: { type: "string" } },
  },
  async execute({ orderId }) {
    const { userId, progress } = currentUser();
    progress?.(
      orderId ? `Looking up order ${orderId}` : "Listing your recent orders",
    );
    const mine = ORDERS.filter((o) => o.customerId === userId);
    if (!orderId) return { orders: mine.map(({ customerId, ...o }) => o) };
    const order = mine.find(
      (o) => o.id.toLowerCase() === String(orderId).trim().toLowerCase(),
    );
    if (!order)
      return { found: false, note: "No order with that id on this account." };
    const { customerId, ...safe } = order;
    return { found: true, order: safe };
  },
});
ORDERS is an in-memory array in the sample so it runs without a database. Swap the filter for your real query, and keep the customerId check in the query itself.
A few habits that make tools work better:
- Write the description for the model, not for your teammates. Say when to use it and what the input looks like. "Look up an order" is vague. "Look up one of the signed-in customer's orders by order id (like A-1042)" tells the model the format and the scope.
- Return small, plain JSON. The model reads every byte you return, and you pay for it. Strip internal fields (like
customerIdhere) before they leave the function. - Return errors as data.
{ found: false, note: "..." }lets the model explain the problem to the customer. A thrown exception just ends the run. - Scope by user inside the tool. Not in the prompt. Prompts are suggestions; code is a rule.
Step 4: Give it knowledge
Order data comes from your database. Policy questions ("How long do refunds take?") should come from your help articles, so the agent quotes your rules instead of inventing reasonable-sounding ones.
DNotifier has a built-in knowledge base with semantic search. Load your articles once:
server/seed-knowledge.js
// seed-knowledge.js: run once (npm run seed) to load help articles into the knowledge base.
// Writing documents through the API needs the Pro or Enterprise plan; on Starter,
// upload the same text in the dashboard instead.
import { notifier } from "./notifier.js";

const articles = [
  {
    recordId: "policy-refunds",
    content:
      "Refunds: you can ask for a refund within 30 days of delivery. Items must be unused. " +
      "Approved refunds go back to the original payment method within 5 to 7 business days. " +
      "Shipping fees are refunded only if the item arrived damaged or was the wrong item.",
  },
  {
    recordId: "policy-shipping",
    content:
      "Shipping: orders ship within 2 business days. Standard delivery takes 3 to 5 business days " +
      "after dispatch. Tracking links are emailed when the order ships.",
  },
  {
    recordId: "policy-damaged",
    content:
      "Damaged items: send a photo within 7 days of delivery and we replace the item or refund it in full, " +
      "including shipping. You do not need to return a damaged item.",
  },
];

for (const a of articles) {
  await notifier.addDocument({
    senderId: "order-help-api",
    recordId: a.recordId,
    content: a.content,
    type: "text",
    metadata: { source: "help-center" },
  });
  console.log("added", a.recordId);
}
Then wrap search in a tool so the agent decides when it needs it:
export const searchPolicy = notifier.tools.register({
  name: "policy.search",
  description:
    "Search the store's help articles: refunds, returns, shipping, warranty.",
  inputSchema: {
    type: "object",
    properties: { query: { type: "string" } },
    required: ["query"],
  },
  async execute({ query }) {
    const hits = await notifier.search({
      senderId: "order-help-api",
      query,
      limit: 3,
      minSimilarity: 0.5,
    });
    return { hits };
  },
});
That's retrieval-augmented generation (RAG) without a separate vector database, embedding pipeline or sync job. If you'd rather not write to the knowledge base from code, you can upload the same text in the dashboard; API writes need the Pro or Enterprise plan.
Step 5: Define the agent
With tools in place, the agent itself is mostly a job description:
server/agent.js
// agent.js: the agent itself is mostly a job description.
import { DNotifier } from "@dnotifier-realtime/dnotifier";
import { lookupOrder, searchPolicy, requestRefund } from "./tools.js";

export const orderAgent = DNotifier.defineAgent({
  name: "order-help",
  description:
    "Answers order, delivery and refund questions for signed-in customers",
  instructions: `You are the order help assistant for an online store.
- Use orders.lookup for anything about a specific order. Never guess a status or a date.
- Use policy.search before you quote any rule about refunds, returns or shipping.
- Only call refunds.request when the customer asks for a refund on a specific order.
  Tell them a person reviews it within one business day. Never promise money back.
- If you can't find the answer with your tools, say so and offer human support.
- Reply in plain sentences, under 80 words. No markdown.`,
  provider: "open_ai",
  model: "gpt-4o",
  observability: true,
  tools: [lookupOrder, searchPolicy, requestRefund],
  permissions: {
    "orders.lookup": ["execute"],
    "policy.search": ["execute"],
    "refunds.request": ["execute"],
  },
});
Because the agent has tools and no custom run function, the SDK runs the tool loop for you. The permissions map lists exactly which tools this agent may execute. Anything not listed is refused.
On the instructions: be specific about _when_ to use each tool and what to do when the tools come back empty. "Never guess a status or a date" does more for accuracy than any amount of "you are a world-class assistant". The word limit and "no markdown" line matter too, because this text lands in a chat bubble, not a document.
Step 6: Run it in the terminal first
Before building any UI, poke it from a script. You'll find out in thirty seconds whether your tool descriptions make sense.
// try.js  (run: node --env-file=.env try.js)
import { notifier, requestContext } from "./notifier.js";
import { orderAgent } from "./agent.js";

const result = await requestContext.run({ userId: "cus_ayesha" }, () =>
  notifier.runAgent(orderAgent, {
    input: "Where is my order A-1042, and how long do refunds take?",
    userId: "cus_ayesha",
    maxToolRounds: 5,
  }),
);

console.log(result.output);
console.log(result.finishReason, result.executionId);
With the logging from Step 2 you'll see each tool call print as it happens. For this question you should see orders.lookup and then policy.search, followed by one short answer that mentions the DHL shipment and the 5 to 7 business day refund window.
Now try to break it. Ask as cus_omar about order A-1042. Ask it to refund something. Ask it about the weather. Each of these should end in a polite, correct refusal. If one doesn't, fix the tool or the instructions now, while it's cheap.
Step 7: Put the agent behind your API
server/index.js
// index.js: the only door into the agent.
import express from "express";
import { notifier, requestContext } from "./notifier.js";
import { orderAgent } from "./agent.js";
import { listPendingRefunds, decideRefund } from "./tools.js";
import { supportWorkflow } from "./workflow.js";

const app = express();
app.use(express.json({ limit: "32kb" }));

// Replace with your real session check (cookie, JWT, Firebase, Clerk, ...).
// The demo trusts a header so you can try it with curl. Do not ship this.
function requireUser(req, res, next) {
  const id = req.get("x-demo-user");
  if (!id) return res.status(401).json({ error: "Sign in first" });
  req.user = { id };
  next();
}

// Short memory: the client sends the last few turns, we fold them into the input.
function buildInput(message, history = []) {
  const turns = history
    .slice(-6)
    .map(
      (t) =>
        `${t.role === "user" ? "Customer" : "Assistant"}: ${String(t.text).slice(0, 500)}`,
    )
    .join("\n");
  return turns
    ? `Earlier in this chat:\n${turns}\n\nNew message: ${message}`
    : message;
}

function readMessage(req, res) {
  const message = String(req.body?.message ?? "")
    .trim()
    .slice(0, 2000);
  if (!message) res.status(400).json({ error: "Empty message" });
  return message;
}

// 1) Plain JSON: simplest thing that works.
app.post("/api/agent", requireUser, async (req, res) => {
  const message = readMessage(req, res);
  if (!message) return;
  try {
    const result = await requestContext.run({ userId: req.user.id }, () =>
      notifier.runAgent(orderAgent, {
        input: buildInput(message, req.body.history),
        userId: req.user.id,
        maxToolRounds: 5,
      }),
    );
    res.json({ answer: result.output, executionId: result.executionId });
  } catch (err) {
    console.error(err);
    res
      .status(502)
      .json({ error: "The assistant could not answer right now." });
  }
});

const port = Number(process.env.PORT ?? 3001);
app.listen(port, () =>
  console.log(`order-help API on http://localhost:${port}`),
);
Two details here are easy to miss.
requireUser is a placeholder. The sample trusts an x-demo-user header so you can test with curl. Replace it with your real session check (cookie, JWT, Firebase Auth, Clerk, whatever you already use). The user ID that goes into requestContext must come from that check, never from the request body.
buildInput is short-term memory. The client sends the last few turns of the chat, and we fold them into the input so "and the other order?" makes sense. We cap it at six turns and 500 characters each. Unbounded history is how a chat that costs fractions of a cent per message slowly becomes expensive.
Try it:
curl -s localhost:3001/api/agent \
  -H "content-type: application/json" -H "x-demo-user: cus_ayesha" \
  -d '{"message":"where is A-1042?"}'
Step 8: A React chat box
The front end doesn't know DNotifier exists. It calls your endpoint:
import { useState } from "react";

export default function OrderHelp({ userId }) {
  const [messages, setMessages] = useState([]);
  const [text, setText] = useState("");
  const [busy, setBusy] = useState(false);

  async function send(e) {
    e.preventDefault();
    if (!text.trim() || busy) return;
    const history = messages.slice(-6);
    setMessages((m) => [...m, { role: "user", text }]);
    setText("");
    setBusy(true);
    try {
      const res = await fetch("/api/agent", {
        method: "POST",
        headers: { "Content-Type": "application/json", "x-demo-user": userId },
        body: JSON.stringify({ message: text, history }),
      });
      const data = await res.json();
      setMessages((m) => [
        ...m,
        { role: "assistant", text: data.answer ?? data.error },
      ]);
    } finally {
      setBusy(false);
    }
  }

  return (
    <form onSubmit={send}>
      {messages.map((m, i) => (
        <p key={i} className={m.role}>
          {m.text}
        </p>
      ))}
      {busy && <p className="status">Checking…</p>}
      <input
        value={text}
        onChange={(e) => setText(e.target.value)}
        disabled={busy}
      />
      <button disabled={busy}>Send</button>
    </form>
  );
}
That's deliberately plain. In AI Agent Architecture we swap it for a streaming version that shows "Looking up order A-1042…" while the tools run, which makes a noticeable difference to how fast the agent feels.
Step 9: A Flutter screen
Same idea on mobile: the app calls your backend over HTTPS and never holds the DNotifier secret. Here's the core of the send method (the full screen, with the message list and input bar, is in the download):
Future<void> _send() async {
  final text = _controller.text.trim();
  if (text.isEmpty || _busy) return;
  final history = _messages.length > 6
      ? _messages.sublist(_messages.length - 6)
      : List<ChatMessage>.of(_messages);

  setState(() {
    _messages.add(ChatMessage('user', text));
    _busy = true;
    _controller.clear();
  });

  try {
    final res = await http
        .post(
          Uri.parse('$apiBase/api/agent'),
          headers: {'Content-Type': 'application/json', 'x-demo-user': widget.userId},
          body: jsonEncode({
            'message': text,
            'history': history.map((m) => m.toJson()).toList(),
          }),
        )
        .timeout(const Duration(seconds: 60));

    final body = jsonDecode(res.body) as Map<String, dynamic>;
    final answer = res.statusCode == 200
        ? (body['answer'] as String? ?? '')
        : (body['error'] as String? ?? 'Something went wrong.');
    setState(() => _messages.add(ChatMessage('assistant', answer)));
  } catch (_) {
    setState(() => _messages.add(ChatMessage('assistant', 'No connection. Try again.')));
  } finally {
    setState(() => _busy = false);
  }
}
apiBase comes from --dart-define=API_BASE=https://api.yourstore.com. The default in the sample, http://10.0.2.2:3001, is how the Android emulator reaches localhost on your machine.
You may have seen Flutter examples that pass the DNotifier secret with --dart-define. That's fine for a prototype on your own phone. Don't ship it: anything compiled into an app can be pulled back out of it.
Prefer Dart on the server too?
The DNotifier Dart SDK runs the same agent on a Dart backend. Dart doesn't have AsyncLocalStorage, but zones do the same job:
final lookup = notifier.tools.register(
  name: 'orders.lookup',
  description: "Look up one of the signed-in customer's orders by id, like A-1042.",
  inputSchema: {
    'type': 'object',
    'properties': {'orderId': {'type': 'string'}},
    'required': ['orderId'],
  },
  execute: (input, context) async {
    final userId = Zone.current[#userId] as String?;
    if (userId == null) return {'error': 'No signed-in user'};
    final match = orders.where(
        (o) => o['id'] == input['orderId'] && o['customerId'] == userId);
    if (match.isEmpty) return {'found': false};
    final order = Map<String, dynamic>.of(match.first)..remove('customerId');
    return {'found': true, 'order': order};
  },
);

final agent = defineAgent(
  name: 'order-help',
  instructions: 'You answer order questions. Always use orders.lookup. '
      'Never guess a status or date. Under 80 words.',
  provider: 'open_ai',
  model: 'gpt-4o',
  tools: [lookup],
  permissions: {'orders.lookup': ['execute']},
);

// inside your request handler, after you've authenticated the user:
final result = await runZoned(
  () => notifier.runAgent(agent, input: message, maxToolRounds: 5),
  zoneValues: {#userId: userId},
);
One note from the Dart docs: a DNotifier instance isn't isolate-safe, so create one per isolate if you run several.
Step 10: Watch it work
Set observability: true on the agent (we did) and every run gets an execution ID and a trace in the dashboard: which tools were called, with what input, what came back, and how long each step took. When a customer says "the bot told me my order was delivered", you look up the run instead of guessing.
Two rules for traces. Don't put secrets or raw personal data into tool inputs and outputs, because they show up in the dashboard. And keep tool results small, which you're already doing for cost reasons anyway.
Deploy it: AWS, Azure or Google Cloud
Everything above runs on your laptop. In production the shape doesn't change: DNotifier stays hosted, and you deploy one container with your API and tools, plus static hosting for the React build. The Flutter app ships through the app stores as usual, built with API_BASE pointing at your API's public URL. For the reasoning behind each piece (secrets, identity, streaming, limits), see AI Agent Architecture.
Deploy to AWS
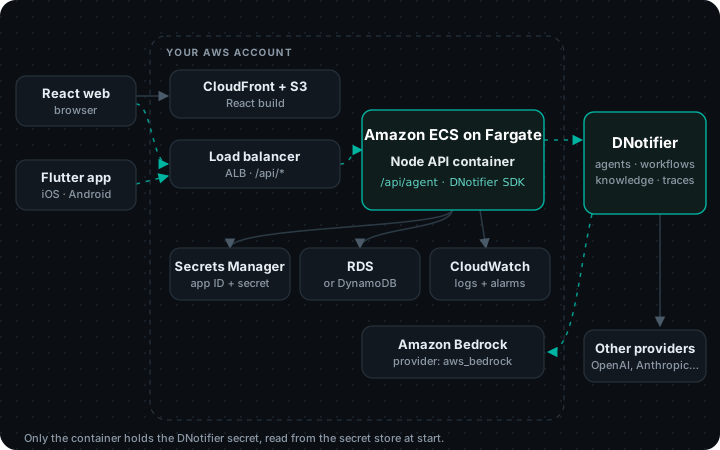
| Piece | AWS service | Why |
|---|---|---|
| React build | S3 bucket behind CloudFront | Static files on a CDN. Add a second CloudFront behavior for /api/* pointing at the load balancer, so the browser calls the same domain. |
| Node container | Amazon ECS on Fargate, behind an Application Load Balancer | Long-lived containers handle server-sent events and WebSockets without timeouts. (App Runner moved to maintenance mode in 2026; AWS points new apps to ECS Express Mode.) |
| App ID + secret | AWS Secrets Manager | Injected into the task as environment variables through the task definition's secrets block. Never baked into the image. |
| Your data | Amazon RDS or DynamoDB | Only your tool code talks to it, from inside the VPC. |
| Logs | CloudWatch Logs | Log the DNotifier executionId next to each request, so you can jump from a CloudWatch line to the run trace. |
| Models (optional) | Amazon Bedrock via the aws_bedrock provider | Add Bedrock in AI Studio → Providers if you want inference billed to your AWS account. Any other provider works too. |
# 1. Store the credentials (once)
aws secretsmanager create-secret --name dnotifier/prod \
  --secret-string '{"DNOTIFIER_APP_ID":"<app-id>","DNOTIFIER_SECRET":"<secret>"}'

# 2. Build and push the image
aws ecr create-repository --repository-name order-help-api
aws ecr get-login-password | docker login --username AWS --password-stdin <account>.dkr.ecr.<region>.amazonaws.com
docker build -t <account>.dkr.ecr.<region>.amazonaws.com/order-help-api:1 .
docker push <account>.dkr.ecr.<region>.amazonaws.com/order-help-api:1

# 3. In the ECS task definition, pull the values from Secrets Manager:
#   "secrets": [
#     { "name": "DNOTIFIER_APP_ID", "valueFrom": "<secret-arn>:DNOTIFIER_APP_ID::" },
#     { "name": "DNOTIFIER_SECRET", "valueFrom": "<secret-arn>:DNOTIFIER_SECRET::" }
#   ],
#   "portMappings": [{ "containerPort": 3001 }]
Watch out: Set the load balancer's idle timeout above your longest agent run if you use the streaming endpoint.
Deploy to Azure
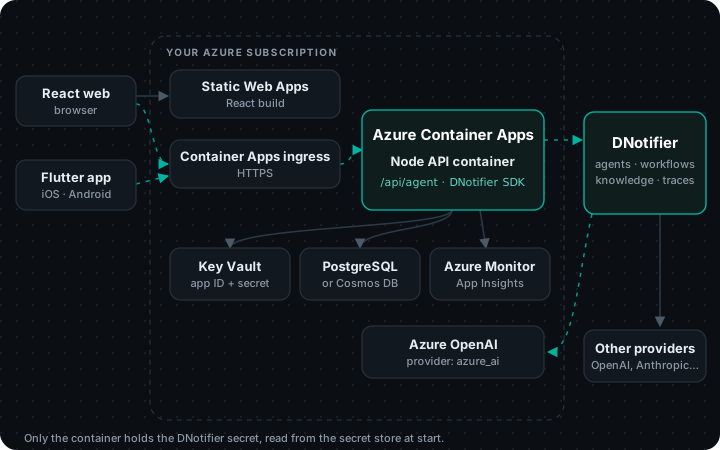
| Piece | Azure service | Why |
|---|---|---|
| React build | Azure Static Web Apps | Link the Container App as the site's backend (Standard plan) so /api calls stay on the same domain, or call the API's own URL with CORS. |
| Node container | Azure Container Apps | Managed containers with HTTPS ingress, scale rules and long-lived connections. |
| App ID + secret | Container Apps secrets, backed by Key Vault | Store the secret in Key Vault and reference it from the app with a managed identity; expose it as an env var with secretref:. |
| Your data | Azure Database for PostgreSQL or Cosmos DB | Reachable only from your app's environment. |
| Logs | Azure Monitor / Application Insights | Log the DNotifier executionId with each request. |
| Models (optional) | Azure OpenAI via the azure_ai provider | Keeps model usage on your Azure bill and in your chosen region. Any other provider works too. |
# 1. Build from source and deploy (creates the environment if needed)
az containerapp up --name order-help-api --resource-group dnotifier-rg \
  --location westeurope --source . --ingress external --target-port 3001

# 2. Add the secret and point env vars at it
az containerapp secret set -n order-help-api -g dnotifier-rg \
  --secrets dnotifier-secret=<secret>
az containerapp update -n order-help-api -g dnotifier-rg \
  --set-env-vars DNOTIFIER_APP_ID=<app-id> DNOTIFIER_SECRET=secretref:dnotifier-secret NODE_ENV=production
Watch out: If you use Static Web Apps linked backends, the API is only reachable through the site; that's usually what you want.
Deploy to Google Cloud
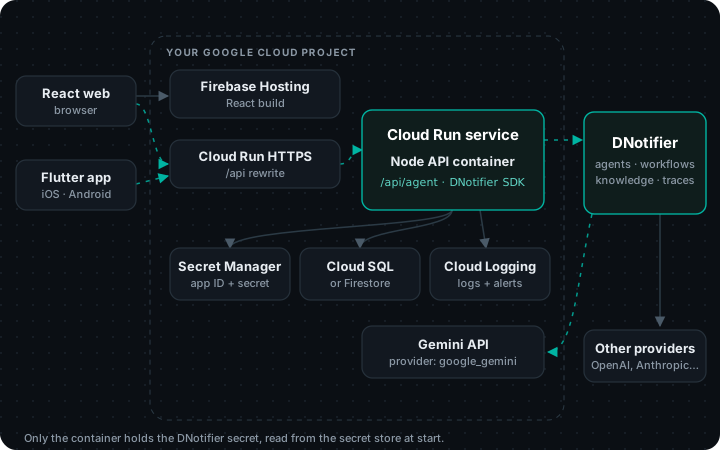
| Piece | Google Cloud service | Why |
|---|---|---|
| React build | Firebase Hosting | Rewrite /api/** to the Cloud Run service so the browser calls the same domain. Hosting-to-Cloud Run requests time out after 60 seconds, so keep agent runs short or call Cloud Run's URL directly for long streams. |
| Node container | Cloud Run | Deploy straight from source. Cloud Run sets PORT, which the example server already reads. |
| App ID + secret | Secret Manager | Mounted as env vars with --set-secrets. Never in the image or in the repo. |
| Your data | Cloud SQL or Firestore | Only your tool code reads it. |
| Logs | Cloud Logging | Log the DNotifier executionId with each request. |
| Models (optional) | Gemini via the google_gemini provider | Add your Gemini key in AI Studio → Providers. Any other provider works too. |
# 1. Store the secret (once)
printf '%s' '<secret>' | gcloud secrets create dnotifier-secret --data-file=-

# 2. Build from source and deploy
gcloud run deploy order-help-api --source . --region europe-west1 \
  --set-env-vars DNOTIFIER_APP_ID=<app-id>,NODE_ENV=production \
  --set-secrets DNOTIFIER_SECRET=dnotifier-secret:latest \
  --allow-unauthenticated   # your own auth still runs inside the app
Watch out: Cloud Run scales to zero by default. The first request after a quiet period pays a cold start; set --min-instances 1 if that matters.
# Dockerfile (same on every cloud)
FROM node:22-slim
WORKDIR /app
COPY package*.json ./
RUN npm install --omit=dev
COPY . .
ENV NODE_ENV=production
EXPOSE 3001
CMD ["node", "index.js"]
Mistakes that break first agents
Too many tools. Every tool description is in the prompt on every turn. Twenty tools means the model spends effort choosing, and chooses wrong more often. Start with two or three.
Trusting the model with identity. If the user ID travels through the prompt, someone will eventually talk the model into using a different one. Keep it in your request context.
Letting the agent take irreversible actions. Our refund tool opens a request; a person approves it. Use the same pattern for payments, deletions and anything sent to a customer outside the chat.
No round limit. maxToolRounds caps the loop. Without it, a confused agent can call the same tool again and again on one question.
Vague tool descriptions. If the model calls the wrong tool, the fix is almost always in the description, not the instructions.
Testing only the happy path. Ask the rude question, the off-topic question, the question about someone else's data. Then ask them again next week after you've changed the prompt.
Where to go next
This is part 1 of our _Build it with DNotifier_ series:
- How to Create an AI Agent in 5 Minutes: the fastest path to a running agent.
- AI Agent Architecture: How to Add an Agent to Your App: streaming, security and human approval in production.
- How to Build an AI Workflow in 5 Minutes
- How to Build an AI Workflow in Code
- How to Build a Multi-Agent Workflow
Build your first agent on DNotifier. One SDK for agents, tools, a knowledge base and code-first workflows, across 8 model providers. Create your app · See pricing · Read the docs
Next in the series: Part 2: How to Create an AI Agent in 5 Minutes
Get the code. Every example in this series, as runnable projects: dnotifier-agent-workflow-examples.zip. Run each one with your own app ID, secret and model key.
FAQ
What do I need to build an AI agent?
A model provider (OpenAI, Anthropic, Gemini or another), a few functions the agent can call, written instructions for its job, and a runtime that runs the model-tool loop. With DNotifier you register tools with notifier.tools.register(), define the agent with DNotifier.defineAgent() and run it with notifier.runAgent().
How do I build an AI agent if I've never built one?
Start with one job and one tool. Build an AI agent that does that one thing in a terminal (the 5-minute version is a good first step), then move it behind your API and add tools one at a time, as in this guide.
How do you build an AI agent from scratch without a framework?
Yes. You can write the loop yourself against a model API: send the prompt with tool schemas, parse tool calls, run them, send results back, repeat. It's a good learning exercise. In production you'll also want permissions, round limits, retries, tracing and a knowledge base, which is the part a platform saves you from writing.
How to build your own AI agent without an ML team?
You don't need one. Teams that build AI agents for their products mostly write ordinary backend code: tool functions, permission checks and a clear job description. The model provider trains and hosts the model; DNotifier runs the loop. Build AI agents the way you build any other feature, and test them the same way.
How long does it take to build an AI agent?
A working prototype takes minutes; see our 5-minute guide. A production agent like the one in this article, with auth, scoped tools, a knowledge base and a UI on web and mobile, is a few days of focused work for one developer.
Which programming language should I use?
Whatever your backend already uses. DNotifier has SDKs for JavaScript/TypeScript, Python and Dart/Flutter, and the agent code looks almost the same in each. Check the docs for the current list.
Is it safe to let an AI agent call my API?
It's as safe as the tools you give it. Keep tools narrow, scope every query to the signed-in user inside the tool, list allowed tools in the agent's permissions, and route irreversible actions (refunds, payments, deletions) through human approval.
What's the difference between an AI agent and a chatbot?
A chatbot replies to messages. An agent can also act: it decides which of your functions to call, reads the results, and keeps going until the task is done.